
There’s something magical about the combination of chocolate and cheesecake. The rich, velvety texture paired with the deep, complex flavors of chocolate creates a dessert experience that’s simply unforgettable. As someone who has been baking cheesecakes for over a decade, I’ve experimented with countless variations, but this Silky Chocolate Cheesecake recipe stands head and shoulders above the rest. It’s the kind of dessert that makes people close their eyes when they take the first bite, savoring every moment of the experience.
Why This Recipe Works
Before we dive into the details, let me share why this particular recipe has become my go-to chocolate cheesecake. The secret lies in the balance of ingredients and technique. Many chocolate cheesecakes end up being either too dense or too airy, but this recipe achieves that perfect middle ground – silky, creamy, and melt-in-your-mouth smooth.
I’ve spent years refining this recipe, adjusting ingredients, temperatures, and techniques until I achieved what I consider to be the perfect chocolate cheesecake. The combination of high-quality chocolate, careful temperature control, and proper cooling creates a texture that’s simply unmatched.
Ingredients Breakdown
Let’s take a closer look at what goes into this masterpiece:
For the Crust
- 200g chocolate sandwich cookies (cream included)
- 60g unsalted butter, melted
- Pinch of salt
For the Filling
- 680g full-fat cream cheese, at room temperature
- 150g granulated sugar
- 30g unsweetened cocoa powder, sifted
- 3 large eggs, at room temperature
- 1 large egg yolk, at room temperature
- 120ml heavy cream
- 1 tsp pure vanilla extract
- 1/4 tsp fine sea salt
- 200g dark chocolate (70% cocoa solids), melted and slightly cooled
For the Ganache Topping
- 120g dark chocolate, finely chopped
- 120ml heavy cream
- 20g unsalted butter, room temperature
- Pinch of salt
Key Ingredients and Their Roles
Understanding what each ingredient brings to the table helps you appreciate why this recipe works so well:
Cream Cheese : The foundation of any great cheesecake. Using full-fat cream cheese at proper room temperature ensures a smooth, creamy texture without lumps. The fat content is crucial for the silky mouthfeel we’re aiming for.
Dark Chocolate : The star of the show. Using high-quality dark chocolate with around 70% cocoa solids gives the cheesecake depth and complexity without becoming overly sweet. The slight bitterness balances beautifully with the creamy base.
Cocoa Powder : This amplifies the chocolate flavor and adds richness. Sifting it is crucial to avoid lumps in your batter.
Heavy Cream : Adds moisture and richness to the filling, contributing to the silky texture.
Eggs : Provide structure and stability to the cheesecake while maintaining that creamy texture. The extra yolk adds richness.
Essential Equipment
To achieve the best results, you’ll need:
- 9-inch (23cm) springform pan
- Large roasting pan (for water bath)
- Heavy-duty aluminum foil
- Stand mixer or hand mixer
- Rubber spatula
- Fine-mesh sieve (for sifting cocoa)
- Digital cooking thermometer (optional but helpful)
The Step-by-Step Process
Preparing the Crust
- Preheat your oven to 350°F (175°C).
- Wrap the outside of a 9-inch springform pan with two sheets of heavy-duty aluminum foil, ensuring it comes up the sides. This prevents water from seeping in during baking.
- Process the chocolate cookies (cream and all) in a food processor until finely ground.
- Mix the cookie crumbs with melted butter and salt until the mixture resembles wet sand.
- Press the mixture firmly into the bottom of the springform pan, creating an even layer.
- Bake for 10 minutes, then remove and allow to cool while preparing the filling.
- Reduce oven temperature to 325°F (165°C).
Making the Filling
- In a stand mixer fitted with the paddle attachment, beat the cream cheese on medium-low speed until completely smooth, about 2 minutes.
- Add the sugar and beat until incorporated, scraping down the sides as needed.
- Add the sifted cocoa powder and mix until fully incorporated.
- On low speed, add eggs one at a time, then the extra yolk, allowing each to fully incorporate before adding the next.
- Pour in the heavy cream, vanilla, and salt, mixing just until combined.
- Add the melted and cooled chocolate, mixing gently until completely incorporated. Be careful not to overmix.
- Strain the batter through a fine-mesh sieve to catch any lumps or unmixed bits of cream cheese.
- Pour the batter over the cooled crust, smoothing the top with a spatula.
The Water Bath Method
The water bath is absolutely crucial for achieving that silky texture. Here’s why and how:
- Place the foil-wrapped springform pan in a large roasting pan.
- Pour hot water into the roasting pan until it reaches about halfway up the sides of the springform pan.
- Carefully transfer to the oven, being mindful not to splash water into the cheesecake.
Why use a water bath?
- It creates a gentle, humid environment that prevents the cheesecake from drying out
- It ensures even heat distribution, preventing cracks
- It slows the baking process, allowing for that perfectly silky texture to develop
Baking and Cooling
- Bake at 325°F (165°C) for 55-65 minutes. The cheesecake is done when the edges are set but the center still has a slight wobble (internal temperature should reach about 150°F/65°C).
- Turn off the oven, crack the door open about an inch, and let the cheesecake cool in the oven for 1 hour.
- Remove from the oven and water bath, discard the foil, and run a thin knife around the edge to prevent cracking as it cools.
- Cool completely at room temperature, then refrigerate for at least 6 hours, preferably overnight.
This slow cooling process is another secret to the silky texture. Rapid temperature changes are the enemy of smooth cheesecake!
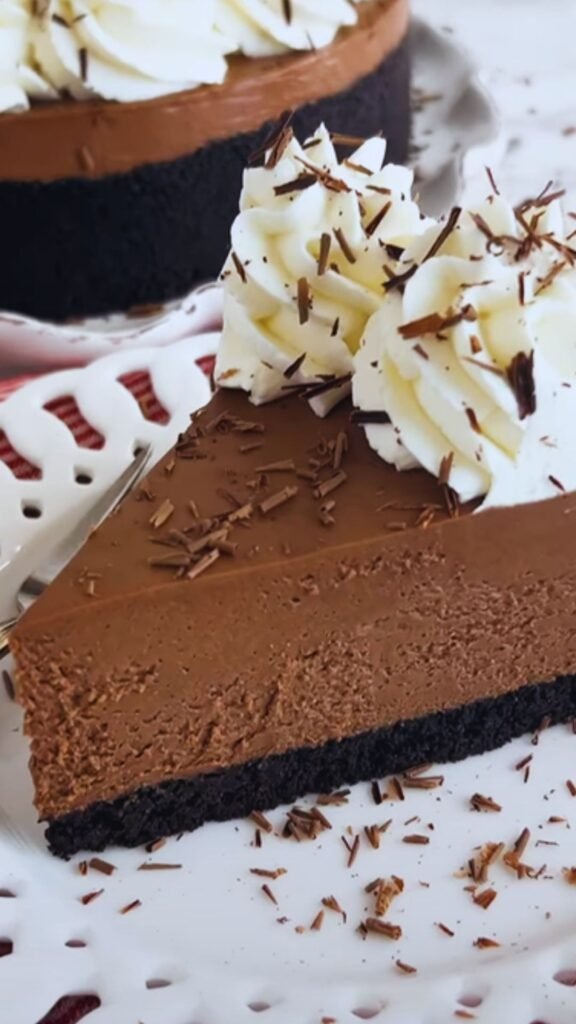
The Chocolate Ganache Topping
Once your cheesecake has fully chilled, it’s time for the crowning glory – a shiny chocolate ganache that adds another layer of luxury to your dessert.
- Place the finely chopped chocolate in a heat-proof bowl.
- Heat the heavy cream until it just begins to simmer.
- Pour the hot cream over the chocolate and let it sit for 1 minute.
- Gently stir until the chocolate is completely melted and the mixture is smooth.
- Add the room temperature butter and salt, stirring until fully incorporated.
- Allow the ganache to cool slightly (but remain pourable) before pouring over the chilled cheesecake.
- Tilt the cheesecake to ensure even coverage, or use a spatula to spread the ganache to the edges.
- Return to the refrigerator for at least 30 minutes to set the ganache.
Troubleshooting Common Issues
Even experienced bakers encounter challenges with cheesecakes. Here are solutions to common problems:
| Problem | Possible Cause | Solution |
|---|---|---|
| Cracks on the surface | Overmixing or rapid temperature changes | 1. Mix on low speed and only until ingredients are combined<br>2. Use a water bath<br>3. Cool gradually in the oven |
| Lumpy batter | Cream cheese not at room temperature | 1. Ensure cream cheese sits out for at least 2 hours<br>2. Cut into cubes to speed up warming<br>3. Strain the batter before baking |
| Soggy crust | Water leaking into pan | 1. Use multiple layers of heavy-duty foil<br>2. Consider using a silicone wrap or oven bag as additional protection |
| Undercooked center | Inaccurate oven temperature | 1. Use an oven thermometer<br>2. Check for proper jiggle (center should wobble slightly but not be liquid)<br>3. Use an instant-read thermometer to check for 150°F (65°C) |
| Sunken middle | Opening oven door during baking | 1. Avoid opening the oven until baking is complete<br>2. Check through the oven window if needed |
Serving Suggestions
The beauty of this Silky Chocolate Cheesecake lies in its versatility. Here are my favorite ways to serve it:
- Classic elegance: A simple dusting of cocoa powder and a few fresh raspberries
- Indulgent option: Drizzle with warm salted caramel sauce and add a dollop of whipped cream
- Texture contrast: Sprinkle with chocolate shavings and crushed hazelnuts
- Fruit pairing: Serve with macerated strawberries or a mixed berry compote
- Coffee companion: Alongside a shot of espresso or a cappuccino
Make-Ahead and Storage Tips
One of the best things about this cheesecake is that it actually improves with time, making it perfect for preparing ahead of special occasions.
Storage Guidelines
| Storage Method | Maximum Time | Notes |
|---|---|---|
| Refrigerator (whole) | 5 days | Keep in springform pan until ready to serve, cover with plastic wrap after ganache has set |
| Refrigerator (sliced) | 3 days | Store slices in airtight container with parchment paper between layers |
| Freezer (whole) | 2 months | Wrap tightly in plastic wrap, then aluminum foil, thaw overnight in refrigerator |
| Freezer (sliced) | 1 month | Freeze slices on parchment paper, then transfer to freezer bags, thaw in refrigerator for 3-4 hours |
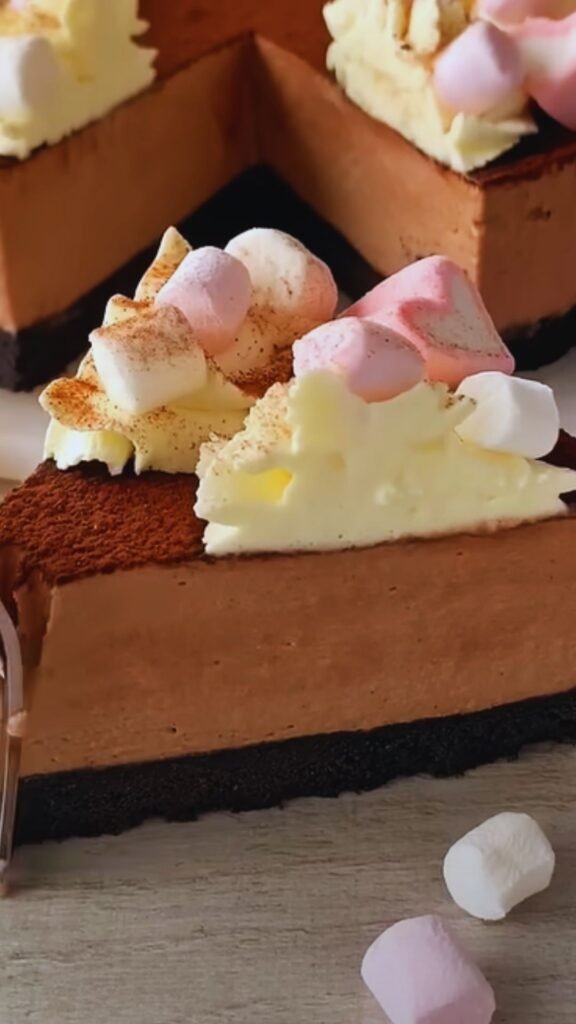
Variations to Try
While the classic recipe is divine, here are some variations I’ve experimented with over the years:
Flavor Twists
- Add 1-2 tsp of espresso powder to enhance the chocolate flavor
- Incorporate 2 tbsp of orange zest for a chocolate-orange combination
- Swirl in 1/4 cup of raspberry puree before baking
- Add 1-2 tbsp of bourbon or rum to the filling for sophistication
Crust Alternatives
- Graham cracker crust for a more traditional approach
- Gingersnap cookies for a spicy contrast
- Toasted hazelnut and cookie crumb mixture for nutty depth
Topping Variations
- White chocolate ganache for stunning visual contrast
- Whipped chocolate ganache for a lighter texture
- Fresh fruit and a glaze for a refreshing finish
Nutritional Information
For those who like to keep track of what they’re enjoying, here’s the approximate nutritional breakdown per slice (assuming 12 slices per cheesecake):
| Nutrient | Amount per Slice |
|---|---|
| Calories | 480 |
| Total Fat | 36g |
| Saturated Fat | 21g |
| Cholesterol | 145mg |
| Sodium | 290mg |
| Total Carbohydrates | 35g |
| Dietary Fiber | 3g |
| Sugars | 28g |
| Protein | 7g |
The Science Behind Perfect Cheesecake
Understanding the science helps you appreciate why certain techniques are so important:
Temperature Control : Room temperature ingredients incorporate more evenly, creating a smoother batter. The water bath provides gentle, even heat that prevents the proteins in eggs from coagulating too quickly, which would lead to a grainy texture.
Minimal Mixing : Overmixing incorporates air, which can cause the cheesecake to puff up during baking and then collapse, leading to cracks. It also develops gluten in the small amount of flour (if using), making the texture less creamy.
Slow Cooling : Gradual temperature changes prevent the dramatic contraction that causes cracks. The structure firms up gradually as it cools, resulting in that perfect silky texture.
Questions & Answers
Q: Do I really need to use a water bath? Absolutely. While it might seem like an extra step, the water bath is crucial for achieving that signature silky texture. It prevents the edges from cooking too quickly and helps maintain an even, gentle heat throughout the baking process. If you’re concerned about leakage, double up on the heavy-duty foil or place your wrapped springform pan inside a slightly larger cake pan before placing in the water bath.
Q: Can I use milk chocolate instead of dark chocolate? You can, but it will change the character of the cheesecake significantly. Milk chocolate has more sugar and less cocoa solids, resulting in a sweeter, less intensely chocolate flavor. If you prefer milk chocolate, reduce the sugar in the filling by about 25g to compensate for the added sweetness.
Q: My ganache seized up and became grainy. What happened? This typically happens when the chocolate is exposed to moisture or if the cream was too hot. Make sure your bowl and utensils are completely dry, and allow the cream to cool slightly after it reaches a simmer before pouring it over the chocolate. If it does seize, you can sometimes rescue it by whisking in a few teaspoons of warm heavy cream.
Q: Can I make this cheesecake without eggs? Traditional cheesecake relies on eggs for structure and that characteristic texture. While there are egg-free cheesecake recipes available, they yield a different result. If you need an egg-free option, look specifically for vegan chocolate cheesecake recipes that use ingredients like silken tofu or cashews as the base.
Q: How can I tell when my cheesecake is done without overbaking it? The perfect cheesecake should still have a slight wobble in the center when it’s done. When you gently shake the pan, the edges should be set, but the center 2-3 inches should still jiggle slightly (not in a liquid way, but more like set Jell-O). Alternatively, an instant-read thermometer inserted into the center should read about 150°F (65°C). Remember that the cheesecake will continue to set as it cools.
Q: Why did my cheesecake crack even though I used a water bath? Several factors can still cause cracks despite using a water bath. Overmixing the batter, opening the oven door during baking, or cooling the cheesecake too quickly are common culprits. Also, ensure you’re running a knife around the edge after baking to allow the cheesecake to contract without pulling away from the sides. The good news is that even a cracked cheesecake tastes delicious, and the ganache topping will hide any imperfections!
Final Thoughts
Creating the perfect Silky Chocolate Cheesecake is part science, part art, and completely worth the effort. The key is respecting the process – taking your time, following the techniques carefully, and allowing the cheesecake to set properly. The result is a dessert that not only looks impressive but delivers a truly memorable eating experience.
I’ve served this cheesecake at countless dinner parties, birthdays, and holiday gatherings, and it never fails to impress. There’s something special about watching someone take their first bite and seeing that moment of pure dessert bliss wash over them.
Whether you’re a seasoned baker or trying your hand at cheesecake for the first time, this recipe provides all the guidance you need to create something truly spectacular. Take your time, enjoy the process, and prepare for the compliments that will inevitably follow!

