There’s something magical about the combination of creamy cheese, spicy jalapeños, and tender chicken that makes my mouth water just thinking about it. If you’ve ever enjoyed jalapeño poppers as an appetizer and thought, “I wish this was an entire meal,” then today is your lucky day! I’ve perfected a recipe that transforms this beloved appetizer into a satisfying main dish that’s guaranteed to impress your family or dinner guests.
My Jalapeño Popper Chicken recipe brings together all the flavors you love – crispy bacon, gooey cream cheese, sharp cheddar, and the perfect kick of jalapeño heat – all embracing juicy chicken breasts. It’s comfort food with a spicy twist that’s surprisingly easy to make yet looks and tastes like something from a high-end restaurant.
As someone who’s experimented with dozens of versions of this dish, I can confidently say this recipe strikes the perfect balance between creamy indulgence and fiery kick. Plus, it’s versatile enough for both weeknight dinners and special occasions. Let me walk you through creating this crowd-pleasing dish that combines two favorites into one incredible meal.
Ingredients
For this Jalapeño Popper Chicken recipe, I’ve carefully chosen ingredients that complement each other and create that authentic jalapeño popper experience. Here’s what you’ll need:
For the Chicken:
- 4 boneless, skinless chicken breasts (about 2 pounds)
- 2 tablespoons olive oil
- 1 teaspoon garlic powder
- 1 teaspoon onion powder
- 1 teaspoon smoked paprika
- 1 teaspoon ground cumin
- 1/2 teaspoon salt
- 1/4 teaspoon black pepper
For the Filling:
- 8 oz cream cheese, softened
- 1 cup shredded sharp cheddar cheese
- 1/4 cup sour cream
- 4-5 jalapeño peppers, seeded and finely diced (keep seeds for extra heat if desired)
- 3 cloves garlic, minced
- 1/4 cup green onions, chopped
- 1/4 teaspoon salt
- 1/4 teaspoon black pepper
For the Topping:
- 1 cup shredded cheddar cheese
- 6 strips bacon, cooked and crumbled
- 2 tablespoons panko breadcrumbs (optional for extra crunch)
- 1 tablespoon fresh cilantro, chopped (for garnish)
- 1 jalapeño, thinly sliced (for garnish)
Kitchen Equipment You’ll Need
Before we dive into the cooking process, let’s make sure you have all the necessary equipment:
- Sharp knife
- Cutting board
- Meat mallet or rolling pin
- Mixing bowls (medium and small)
- Measuring cups and spoons
- Baking dish (9×13 inch)
- Aluminum foil
- Cooking thermometer
- Whisk or fork
- Spatula
- Paper towels
Preparation Time
I know time is precious, so here’s what to expect for preparation and cooking:
| Stage | Time Required |
|---|---|
| Prep Work | 20 minutes |
| Cooking Bacon | 10 minutes |
| Preparing Filling | 10 minutes |
| Preparing Chicken | 15 minutes |
| Baking Time | 25-30 minutes |
| Total Time | About 1 hour 15 minutes |
Nutrition Information
For those watching their nutritional intake, here’s a breakdown of what to expect per serving (one stuffed chicken breast):
| Nutrient | Amount |
|---|---|
| Calories | 520 |
| Protein | 48g |
| Carbohydrates | 5g |
| Fat | 35g |
| Saturated Fat | 17g |
| Fiber | 1g |
| Sugar | 2g |
| Sodium | 780mg |
| Calcium | 350mg |
| Iron | 2mg |
Detailed Instructions
Now let’s get cooking! I’ll guide you through each step of creating this delicious Jalapeño Popper Chicken:
Step 1: Prepare the Bacon
- Preheat your oven to 375°F (190°C).
- Line a baking sheet with aluminum foil or parchment paper.
- Arrange bacon strips in a single layer.
- Bake for 15-18 minutes until crispy but not burnt.
- Transfer to paper towels to drain excess grease.
- Once cool, crumble into pieces and set aside.
Pro tip: You can use the bacon fat for cooking other components of the dish for extra flavor!
Step 2: Prepare the Jalapeño Popper Filling
- In a medium bowl, combine softened cream cheese, 1 cup shredded cheddar, and sour cream.
- Mix well until smooth and creamy.
- Add diced jalapeños, minced garlic, and chopped green onions.
- Season with salt and pepper.
- Stir until all ingredients are evenly distributed.
- Reserve about 1/3 of the mixture for topping the chicken.
Heat management tip: When handling jalapeños, consider wearing gloves to protect your hands, and avoid touching your eyes or face. For a milder dish, remove all seeds and membranes. For more heat, leave some or all seeds in.
Step 3: Prepare the Chicken
- Pat chicken breasts dry with paper towels.
- Place chicken breasts between two sheets of plastic wrap or parchment paper.
- Using a meat mallet or rolling pin, pound chicken to an even thickness of about 1/2 inch. This ensures even cooking and makes the chicken easier to roll.
- Remove plastic wrap and place chicken on a clean cutting board.
- Mix olive oil with garlic powder, onion powder, smoked paprika, cumin, salt, and pepper in a small bowl.
- Brush both sides of each chicken breast with this seasoning mixture.
Step 4: Stuff and Roll the Chicken
- Lay each chicken breast flat on your work surface.
- Spread about 2 tablespoons of the jalapeño popper filling onto each chicken breast, leaving about 1/2 inch around the edges.
- Carefully roll up each chicken breast, tucking in the sides as you go.
- Secure with toothpicks if necessary to keep them from unrolling.
Rolling tip: Don’t overstuff the chicken or it will be difficult to roll and might leak during cooking. A thin, even layer works best.
Step 5: Prepare for Baking
- Lightly grease a 9×13 inch baking dish.
- Arrange the rolled chicken breasts in the dish, seam side down.
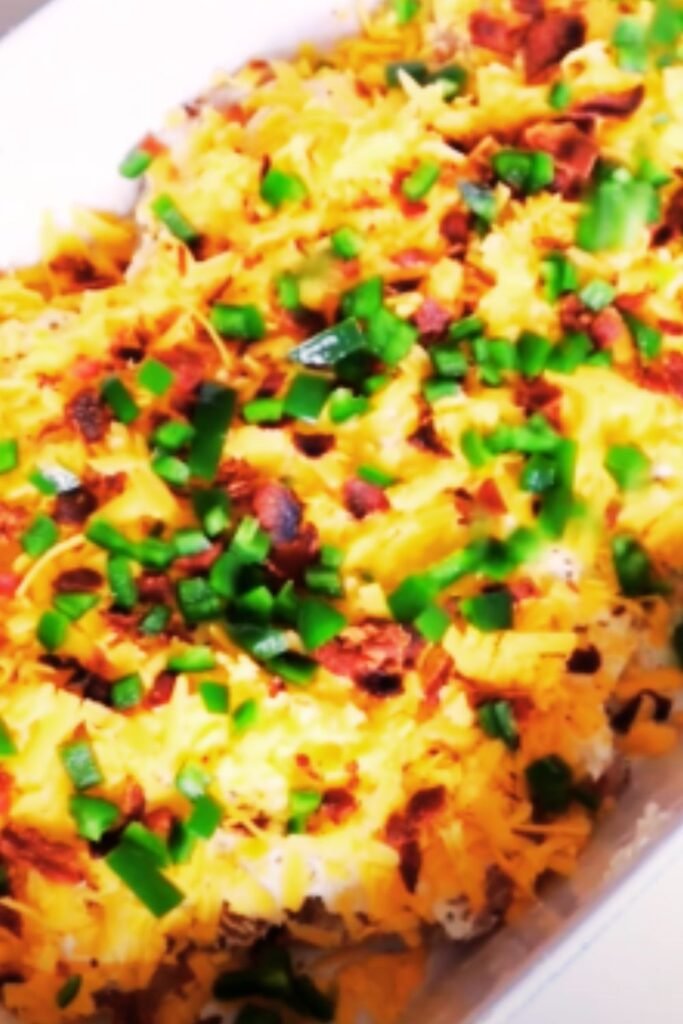
- Spread the reserved filling over the top of each chicken roll.
- Sprinkle the remaining cup of shredded cheddar cheese on top.
- Distribute the crumbled bacon evenly over the cheese.
- If using, sprinkle panko breadcrumbs for extra crunch.
Step 6: Bake to Perfection
- Cover the baking dish with aluminum foil.
- Bake at 375°F (190°C) for 20 minutes.
- Remove the foil and bake for an additional 10-15 minutes, or until the chicken reaches an internal temperature of 165°F (74°C) and the cheese is bubbly and golden.
- Let the chicken rest for 5 minutes before serving.
- Garnish with fresh cilantro and jalapeño slices if desired.

Serving Suggestions
This Jalapeño Popper Chicken is substantial enough to be the star of your meal, but I love pairing it with complementary sides to create a complete dining experience. Here are some of my favorite combinations:
Light and Fresh Options:
- Cilantro lime rice
- Fresh garden salad with avocado
- Grilled corn on the cob with lime butter
- Roasted vegetables with a touch of southwest seasoning
- Mexican-style coleslaw with lime dressing
Heartier Accompaniments:
- Garlic mashed potatoes
- Mexican street corn casserole
- Black bean and corn salad
- Sweet potato fries
- Spanish rice with vegetables
For a refreshing beverage, I recommend serving this dish with:
- Sparkling water with lime
- Homemade lemonade with fresh jalapeño (for adventurous eaters!)
- Iced tea with mint
- Cucumber water

Storage and Reheating Instructions
If you’re lucky enough to have leftovers (which rarely happens in my house!), here’s how to store and reheat this dish properly:
Storage:
- Refrigerate leftovers in an airtight container for up to 3 days.
- For longer storage, you can freeze the cooked chicken for up to 2 months. Wrap individual portions tightly in plastic wrap, then aluminum foil, and place in a freezer bag.
Reheating:
- From refrigerated: Preheat oven to 350°F (175°C). Place chicken in a baking dish with a tablespoon of water or chicken broth, cover with foil, and heat for 15-20 minutes until warmed through.
- From frozen: Thaw overnight in the refrigerator before reheating as above, increasing time to 25-30 minutes.
- Microwave method (quick but not ideal for texture): Place on a microwave-safe plate and cover with a damp paper towel. Heat on 70% power for 2-3 minutes, checking halfway through.
Reheating tip: Adding a little moisture when reheating helps prevent the chicken from drying out. A splash of chicken broth works wonders!
Variations and Customizations
One of the reasons I love this recipe is how adaptable it is. Here are some delicious variations to try:
Spice Level Adjustments:
- Mild version: Remove all seeds and membranes from jalapeños, or substitute with milder green chilies.
- Extra hot version: Keep all seeds and membranes, or add a diced serrano or habanero pepper to the mix.
- Smoky version: Add 1/2 teaspoon of chipotle powder to the filling.
Cheese Variations:
- Mexican blend: Use a combination of Monterey Jack, cheddar, and queso fresco.
- Blue cheese lover’s version: Add 1/4 cup crumbled blue cheese to the filling.
- Extra creamy: Mix in 2 tablespoons of mascarpone cheese with the cream cheese.
Dietary Adaptations:
- Lower fat option: Use Neufchâtel cheese instead of cream cheese, reduced-fat cheddar, and turkey bacon.
- Gluten-free: Skip the panko breadcrumbs or use gluten-free breadcrumbs.
- Keto-friendly: Omit breadcrumbs and serve with cauliflower rice or roasted vegetables.
Protein Substitutions:
- Turkey breast cutlets work well as a substitute for chicken.
- Pork tenderloin slices, pounded thin, can be used for a different flavor profile.
- For a vegetarian twist, try using large portobello mushrooms as vessels for the jalapeño popper filling.

Troubleshooting Common Issues
Even experienced cooks encounter challenges sometimes. Here are solutions to common problems you might face when making this recipe:
Filling Leaks Out During Cooking:
- Make sure not to overstuff your chicken.
- Double-check that your rolls are secure – use toothpicks if necessary.
- Ensure the seam side is placed down in the baking dish.
Chicken Is Dry:
- Don’t overcook! Use a meat thermometer to check for doneness at 165°F (74°C).
- Make sure your chicken is pounded to an even thickness.
- The filling helps keep the chicken moist, so ensure it’s evenly distributed.
Too Spicy or Not Spicy Enough:
- Always taste test a tiny bit of your jalapeños before adding to the filling, as heat levels vary greatly.
- If your finished dish is too spicy, serve with a dollop of sour cream or Greek yogurt to cool it down.
- If not spicy enough, serve with hot sauce on the side.
Cheese Topping Burns:
- Keep the dish covered with foil for most of the cooking time.
- Only uncover for the last 10-15 minutes to allow the cheese to melt and get golden without burning.
Health Benefits
While this dish is certainly indulgent, it does offer some nutritional benefits worth noting:
- High-quality protein from the chicken breasts supports muscle maintenance and growth.
- Jalapeños contain capsaicin, which has been linked to metabolism-boosting properties and may help reduce inflammation.
- When consumed in moderation, the calcium from cheese supports bone health.
- The dish is naturally low in carbohydrates, making it suitable for those following lower-carb eating plans.
- The fats present are primarily from dairy and olive oil, which can be part of a balanced diet.
To make this dish part of a healthier meal, consider:
- Serving with a large portion of non-starchy vegetables
- Controlling portion sizes
- Choosing lower-fat dairy options if you’re watching saturated fat intake
Q&A Section
Q: Can I prepare this dish ahead of time? A: Absolutely! You can prepare the jalapeño popper filling and stuff the chicken up to 24 hours in advance. Store the prepared (uncooked) chicken rolls in the refrigerator, covered tightly with plastic wrap. When ready to cook, allow the chicken to sit at room temperature for about 15 minutes before baking as directed, possibly adding 5 minutes to the cooking time since you’re starting with chilled chicken.
Q: How do I know if my jalapeños will be too spicy? A: The heat level of jalapeños can vary significantly. A good way to test is to take a tiny taste of the jalapeño after removing the seeds and membranes. If it’s still too hot for your preference, soak the diced jalapeños in cold water for 10 minutes, then drain well before adding to your filling. This helps remove some of the heat while preserving the flavor.
Q: Can I make this dish without bacon? A: Yes! While bacon adds a wonderful smoky flavor and crunch, you can omit it entirely for a vegetarian option or substitute with turkey bacon for a lighter version. For a bacon-free crunch, try doubling the panko breadcrumbs mixed with a bit of smoked paprika.
Q: What’s the best way to soften cream cheese quickly? A: If you forgot to take your cream cheese out ahead of time, unwrap it and place it on a microwave-safe plate. Microwave in 10-second intervals, checking after each, until just softened but not melted. Alternatively, cut the cream cheese into small cubes and leave at room temperature for about 15-20 minutes – they’ll soften much faster than a whole block.
Q: Can I use chicken thighs instead of breasts? A: Yes, boneless, skinless chicken thighs can work, though they’re typically smaller than breasts. You may need to use toothpicks to secure them after rolling, and adjust cooking time accordingly (they may cook slightly faster). The advantage is that thighs tend to be juicier and more forgiving if slightly overcooked.
Q: How do I prevent the chicken from unrolling while cooking? A: If you’re having trouble keeping your chicken rolls secure, try these tricks: 1) Use toothpicks to pin the edges closed, 2) Wrap each rolled chicken breast in a strip of bacon, which helps hold it together while adding flavor, or 3) Tie each roll with kitchen string in 2-3 places. Just remember to remove toothpicks or string before serving!
Q: Is there a way to reduce the calories in this recipe? A: Several modifications can reduce calories: use Neufchâtel cheese (⅓ less fat than cream cheese), reduced-fat cheddar, Greek yogurt instead of sour cream, and turkey bacon instead of regular bacon. You can also make the chicken rolls smaller and serve with a large portion of vegetables for a more calorie-conscious meal.
Q: Can I use canned jalapeños if fresh aren’t available? A: Yes, drained pickled jalapeños can work in a pinch, though they will change the flavor profile slightly. Use about 1/3 cup of diced pickled jalapeños, and reduce any added salt in the filling since pickled jalapeños already contain sodium.
My Personal Tips
After making this dish countless times, I’ve picked up a few tricks that really elevate the final result:
- Temperature matters – having your cream cheese properly softened (but not melted) makes for a much smoother filling that’s easier to spread.
- For the most tender chicken, remove it from the refrigerator about 20 minutes before preparing. Room temperature chicken cooks more evenly.
- If you’re sensitive to handling jalapeños, use the back of a spoon to scrape out seeds and membranes rather than your fingers, even with gloves on.
- For a beautiful presentation, save some of the filling ingredients (a bit of diced jalapeño, some green onion) to sprinkle on top after baking.
- The thickness of your chicken breast matters tremendously – take your time with the pounding step to ensure even thickness throughout.
- If you’re cooking for mixed spice preferences, consider making half the batch spicier by adding extra jalapeño seeds to just some of the filling.
- Don’t rush the final rest time after baking – those 5 minutes allow the juices to redistribute throughout the chicken and prevent a dry result.
This Jalapeño Popper Chicken has become one of my signature dishes, requested at family gatherings and dinner parties alike. The combination of creamy, spicy, and savory elements creates a memorable meal that feels special but doesn’t require advanced cooking skills. I hope you enjoy making and eating it as much as I do!