There’s something magical about a dish that brings people together, letting everyone customize their own meal exactly how they like it. That’s why I’m obsessed with hosting baked potato bars whenever I entertain! It’s the perfect solution for feeding a crowd while accommodating different tastes and dietary preferences.
I’ve been perfecting my baked potato bar strategy for years, and I’m excited to share everything I’ve learned with you. Whether you’re planning a casual family gathering, game day party, or even a budget-friendly wedding reception option, a potato bar will be a guaranteed crowd-pleaser.
What Makes a Potato Bar Special?
A baked potato bar is essentially a serving station centered around perfectly baked potatoes with an array of toppings that guests can mix and match to create their ideal loaded potato. It’s interactive, fun, and surprisingly versatile!
I love hosting potato bars because:
- They’re budget-friendly but still feel special
- Most of the prep work can be done ahead of time
- They accommodate various dietary needs with simple adjustments
- The setup creates a natural gathering spot for conversation
- Everyone gets exactly what they want!
Selecting the Perfect Potatoes
The foundation of any great potato bar starts with choosing the right potatoes. After testing countless varieties over the years, I’ve found that russet potatoes (sometimes called Idaho potatoes) are the absolute best choice.
Russets have:
- A fluffy interior that becomes perfectly tender when baked
- A sturdy skin that crisps nicely
- Enough structure to hold up under heavy toppings
- A neutral flavor that pairs well with anything
For a main course portion, I recommend selecting medium to large potatoes, about 8-10 ounces each. Plan on 1-2 potatoes per person, depending on your guests’ appetites and what other foods you’re serving.
Perfect Baked Potato Methods
I’ve experimented with every baking method imaginable, and I’m happy to share the pros and cons of each approach so you can choose what works best for your situation.
Classic Oven Method (My Go-To)
This is my preferred method for the best texture and flavor:
- Preheat your oven to 425°F
- Wash and thoroughly dry your potatoes
- Poke each potato 8-10 times with a fork
- Rub the skins lightly with olive oil and sprinkle with kosher salt
- Place potatoes directly on the middle oven rack (put a baking sheet on the rack below to catch any drips)
- Bake for 45-60 minutes until skin is crisp and interior reaches 205°F
- Let rest for 5 minutes before serving
Time-Saving Microwave + Oven Method
When I’m short on time but still want that crispy exterior:
- Wash, dry, and poke potatoes with a fork
- Microwave potatoes for 5-6 minutes (turning halfway)
- Transfer to a 425°F oven for 15-20 minutes to crisp the skin
- Let rest briefly before serving
Slow Cooker Method (For Hands-Off Cooking)
Perfect when I need to free up oven space:
- Wash, dry, and poke potatoes with a fork
- Wrap each potato in foil
- Cook on LOW for 8-10 hours or HIGH for 4-5 hours
- Note: Skins won’t be crispy with this method, but the convenience is worth it sometimes!
Air Fryer Method (For Small Batches)
When I’m making just a few potatoes:
- Wash, dry, and poke potatoes
- Rub with oil and salt
- Air fry at 400°F for about 30-40 minutes, turning halfway
Keeping Potatoes Hot During Service
One challenge with a potato bar is keeping everything at the right temperature. Here are my tried-and-true strategies:
- Foil Wrap: After baking, wrap potatoes in foil and place in a cooler or insulated container. They’ll stay hot for up to 2 hours!
- Slow Cooker: Transfer foil-wrapped potatoes to a slow cooker on the “warm” setting.
- Chafing Dish: For larger gatherings, use a chafing dish with a little water in the bottom pan.
- Split Just Before Serving: I like to split the potatoes just before guests serve themselves. This preserves heat and lets people fluff their own potatoes.
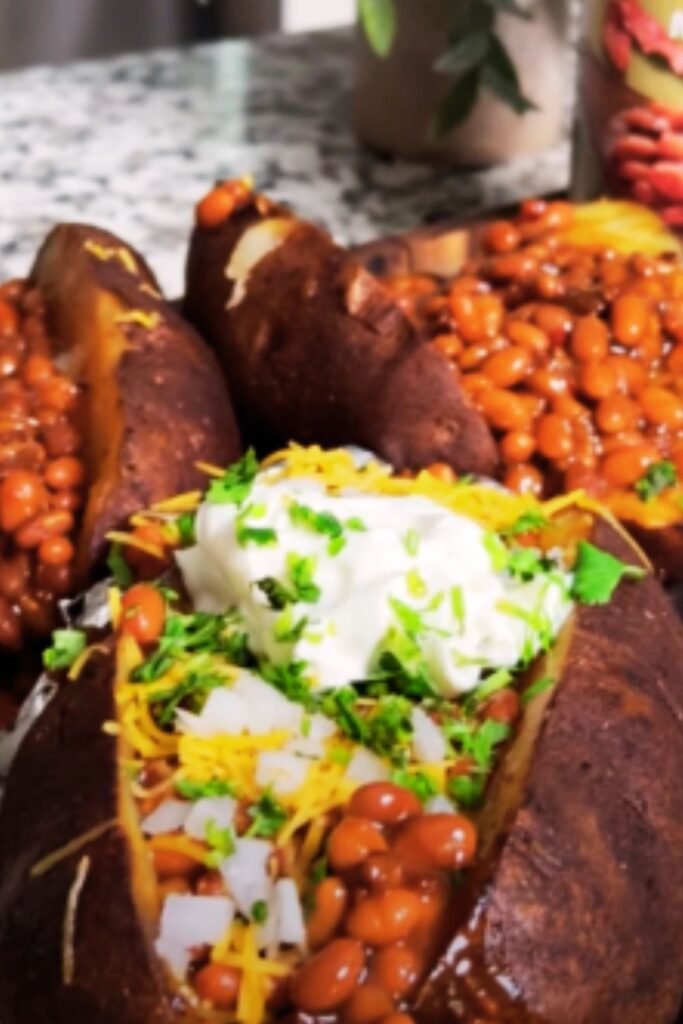
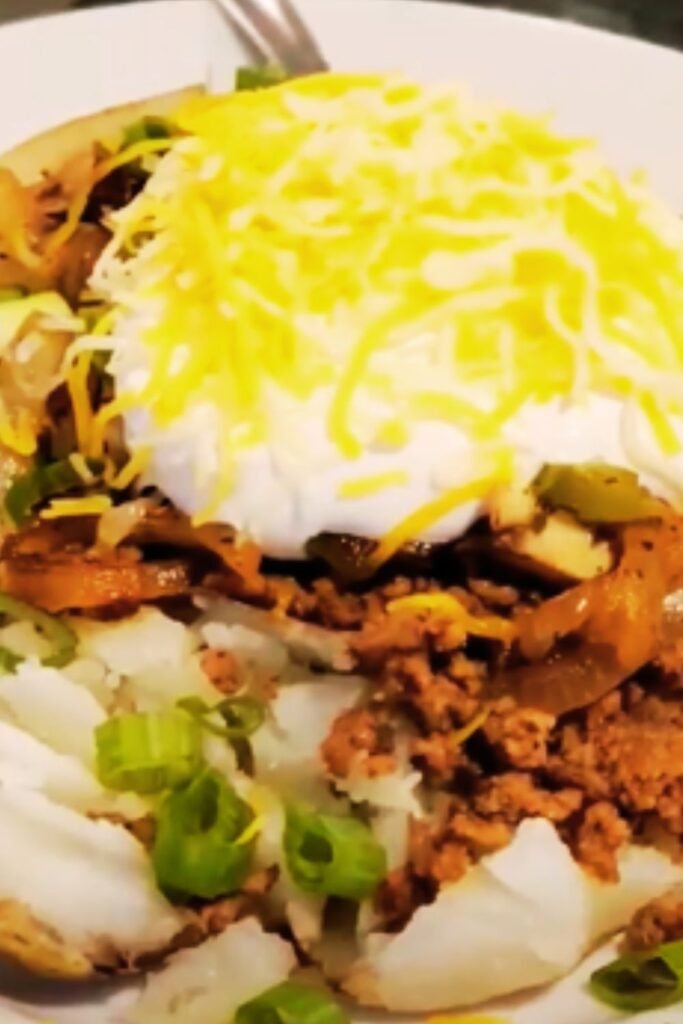
Essential Toppings for Your Potato Bar
The beauty of a potato bar lies in the variety of toppings! I categorize my toppings into must-haves and extras:
Must-Have Foundations
| Topping | Preparation Notes | Serving Suggestion |
|---|---|---|
| Butter | Room temperature for easy spreading | Small butter dishes with butter knives |
| Sour Cream | Full-fat provides the best flavor | Serve with a ladle or large spoon |
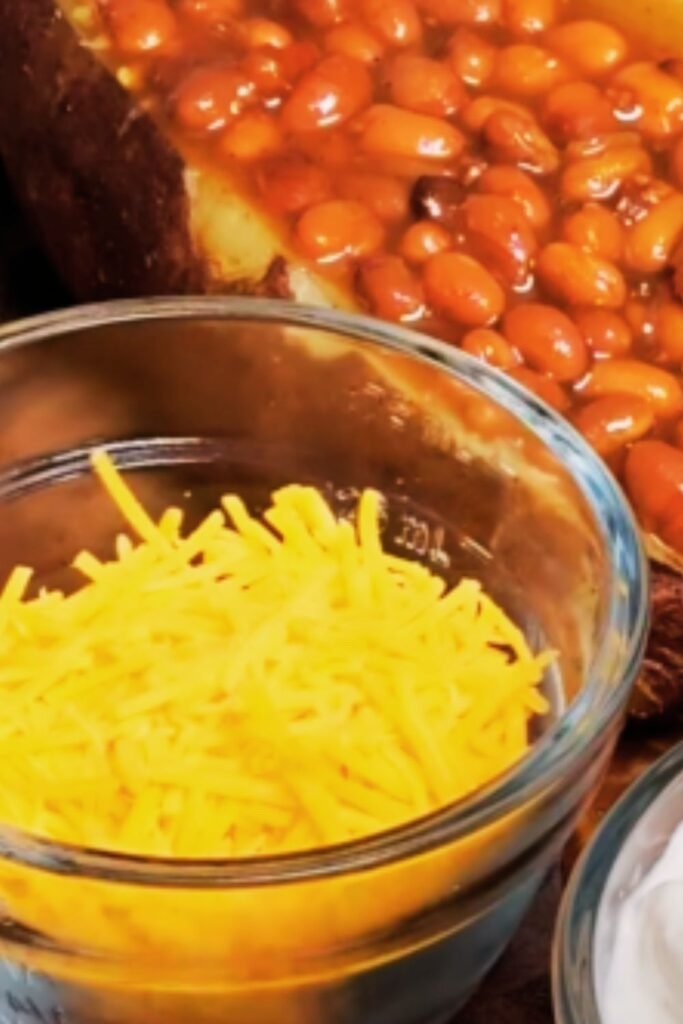
| Shredded Cheese | Pre-shredded saves time, but freshly grated tastes better | Offer 2-3 varieties (cheddar, Monterey jack, pepper jack) |
| Bacon | Cook until crisp, drain, and crumble | Can be made a day ahead and reheated |
| Chives/Green Onions | Finely chopped | Keep in sealed container until serving |
| Salt & Pepper | Freshly ground if possible | Small salt cellars with tiny spoons |
Protein Options
| Protein | Preparation | Serving Tips |
|---|---|---|
| Chili | Beef, turkey, or vegetarian options | Keep warm in a slow cooker |
| Pulled Pork | Slow-cooked with BBQ sauce | Serve warm in a chafing dish |
| Taco Meat | Seasoned ground beef or turkey | Reheat just before serving |
| Grilled Chicken | Diced or shredded | Warming tray or covered dish |
| Broccoli Cheddar | Mix cooked broccoli with cheese sauce | Warm serving dish with lid |
Fresh Toppings & Vegetables
| Veggie | Preparation | Serving Suggestion |
|---|---|---|
| Steamed Broccoli | Cut into small florets | Serve slightly warm |
| Sautéed Mushrooms | Slice and sauté with garlic | Room temperature is fine |
| Roasted Corn | Charred kernels cut from cob | Can mix with black beans |
| Caramelized Onions | Slow cooked until sweet | Serve warm if possible |
| Fresh Tomatoes | Diced small | Drain excess liquid before serving |
| Avocado/Guacamole | Add lime juice to prevent browning | Keep covered until serving |
| Jalapeños | Sliced thin (seeds removed for less heat) | Small bowl with fork |
Sauce & Flavor Enhancers
| Item | Notes | Serving Suggestion |
|---|---|---|
| BBQ Sauce | Offers smoky-sweet flavor | Small pitcher or bottle |
| Hot Sauce Varieties | Offer mild to spicy options | Original bottles with caps |
| Ranch Dressing | Popular with kids | Small pitcher or squeeze bottle |
| Pesto | Brightens with fresh herb flavor | Small dish with spoon |
| Salsa | Fresh or jarred works well | Bowl with slotted spoon |
Setting Up Your Potato Bar
The presentation of your potato bar matters! Here’s how I set mine up for maximum efficiency and visual appeal:
The Flow
I arrange my potato bar in a logical sequence:
- Plates and napkins at the beginning
- Potatoes (with tongs or mitts for handling)
- Base toppings (butter, sour cream)
- Proteins
- Vegetables and extras
- Cheese and final toppings
- Utensils at the end
Display Tips
- Elevation: Use cake stands, boxes covered in pretty fabric, or risers to create height differences
- Labeling: Small chalkboard or printed labels for each topping, especially helpful for identifying spicy items
- Portion Control: Appropriate serving utensils for each item (spoons, tongs, ladles)
- Temperature Control: Keep cold items on ice and hot items in warming trays
- Grouping: Arrange complementary flavors near each other (like chili near cheddar cheese)
Theme Ideas for Your Potato Bar
One way I love to make my potato bars memorable is by creating a theme. Here are some of my favorites:
Tex-Mex Potato Bar
- Taco meat
- Black beans
- Mexican-style cheese blend
- Pico de gallo
- Guacamole
- Jalapeños
- Cilantro
- Lime wedges
Steakhouse Potato Bar
- Steak bites
- Sautéed mushrooms
- Blue cheese crumbles
- Creamed spinach
- Crispy onion straws
- Horseradish sauce
Italian-Inspired Potato Bar
- Italian sausage crumbles
- Marinara sauce
- Fresh mozzarella
- Roasted red peppers
- Italian herbs
- Pesto
Breakfast Potato Bar (Great for Brunch!)
- Scrambled eggs
- Breakfast sausage
- Ham cubes
- Hollandaise sauce
- Green onions
- Sautéed peppers and onions
Make-Ahead Strategies
The beauty of a potato bar is how much can be prepped ahead of time. Here’s my timeline:
2-3 Days Before:
- Shop for all ingredients
- Prepare and refrigerate any dips or sauces
- Set aside serving dishes and label them
The Day Before:
- Wash and dry potatoes (do not poke until ready to cook)
- Chop vegetables that won’t brown
- Cook and crumble bacon
- Prepare proteins like chili or pulled pork
- Grate cheese if using freshly grated
Morning of Event:
- Set up serving area with dishes and labels
- Bake potatoes
- Final prep of fresh toppings
Just Before Guests Arrive:
- Reheat any warm toppings
- Put out butter to soften
- Arrange everything on the serving table
Cost-Saving Tips
One reason I love potato bars is their affordability! Here are my budget-friendly tips:
- Buy potatoes in bulk, especially when on sale
- Use seasonal vegetables for better prices
- Implement a DIY cheese grater station instead of pre-shredded
- Ask guests to bring a topping to share
- Focus on a few high-quality toppings rather than dozens of options
- Use slow cooker recipes for proteins which can utilize less expensive cuts
- Shop sales and freeze items like bacon or cheese in advance
Accommodating Special Diets
I always want everyone at my gatherings to have plenty to eat. Here’s how I make my potato bar inclusive:
For Vegetarians:
- Clear labeling on all toppings
- Plant-based protein options like beans or vegetarian chili
- Plenty of roasted vegetable toppings
For Vegans:
- Offer olive oil instead of butter
- Include dairy-free cheese options
- Provide vegan sour cream alternative
For Gluten-Free Guests:
- Most potato bars are naturally gluten-free
- Double-check any pre-made toppings for hidden gluten
- Keep any gluten-containing items separate to avoid cross-contamination
For Dairy-Free Needs:
- Plant-based butter alternatives
- Dairy-free sour cream options
- Non-dairy cheese alternatives
Sweet Potato Option
I like to include sweet potatoes along with regular russets for variety and nutrition. They require slightly different preparation:
- Wash and poke sweet potatoes
- Rub with oil but skip the salt
- Bake at 400°F for 45-60 minutes (they contain more sugar and can burn at higher temps)
- Offer specific sweet potato toppings like:
- Cinnamon butter
- Brown sugar
- Maple syrup
- Toasted pecans
- Mini marshmallows
- A sprinkle of cayenne for sweet-heat lovers
Serving Suggestions
A potato bar can stand alone as a meal, but I like to round it out with these simple additions:
- Fresh green salad with light vinaigrette
- Crusty bread or dinner rolls
- Fresh fruit platter
- Simple vegetable soup as a starter
- Sparkling water with citrus slices
- Lemonade or iced tea
- Hot apple cider (great for fall/winter gatherings)
For dessert, keep it light since the potatoes are quite filling:
- Fresh fruit crisp
- Small cookies
- Mini cupcakes
- Coffee service
Frequently Asked Questions
How many potatoes should I plan per person?
For a main course, plan on 1-2 potatoes per person depending on the size of the potatoes and your guests’ appetites. If serving other substantial food, one potato per person is usually sufficient.
Can I make the potatoes ahead of time?
Yes! Baked potatoes can be made up to 2 hours ahead and kept warm wrapped in foil inside an insulated container or cooler. For longer storage, you can bake potatoes, refrigerate them, and reheat at 350°F for 15-20 minutes before serving.
What’s the best way to keep toppings at safe temperatures?
Use chafing dishes or slow cookers for hot toppings, and place cold toppings in bowls nestled in larger bowls of ice. Don’t leave perishable toppings at room temperature for more than 2 hours.
How do I calculate how much of each topping to prepare?
As a rule of thumb, prepare about 2-3 tablespoons of each topping per person. For popular items like cheese and sour cream, I increase to 1/4 cup per person. For meaty toppings like chili or taco meat, plan on about 1/3 cup per person.
Can I transport this to a potluck?
Absolutely! Bake potatoes and wrap in foil, then bundle in towels and place in a cooler to keep warm. Transport toppings in separate containers with proper temperature control. Assemble the bar upon arrival.
What if I don’t have warming equipment?
You can use towel-lined baskets to keep foil-wrapped potatoes warm, or insulated food carriers. Another option is to rewarm potatoes at your destination if an oven is available.
How far in advance can I prep the toppings?
Many toppings can be prepped 1-2 days in advance. Proteins like chili actually taste better after a day in the refrigerator. Just avoid cutting anything that browns quickly (like avocados) until shortly before serving.
Are there any creative ways to serve a potato bar for a very large group?
For very large groups, consider setting up multiple identical stations to prevent long lines. You can also pre-split the potatoes and create a “topping assembly line” with servers adding items as guests move through.
Potato Bar Success Stories
I’ve used potato bars for countless occasions, always with rave reviews:
For my daughter’s graduation party, we served 75 people with a potato bar that cost less than $300 total. Guests still talk about how fun and unique it was compared to the usual graduation fare.
At a family reunion, our potato bar accommodated everyone from my vegan niece to my meat-loving uncle. No separate meals needed!
A friend even used my potato bar concept for her rustic wedding reception. Dressed up with beautiful linens and serving pieces, it was both practical and charming.
The interactive nature of a potato bar naturally encourages conversation and connection. I’ve watched guests compare their potato creations and share topping ideas, creating exactly the kind of memorable gathering I love to host.
Whether you’re feeding a crowd on a budget or looking for a fun entertaining concept that pleases everyone, I can’t recommend a baked potato bar enough. With the tips and strategies I’ve shared, you’ll be able to create a gathering that’s delicious, memorable, and surprisingly stress-free. Happy hosting!