
There’s chocolate, and then there’s chocolate – the kind that makes you close your eyes and forget everything else around you. Today, I’m sharing my recipe for Death by Chocolate Mousse, a dessert so rich and decadent that it might just be the most intensely chocolatey experience you’ll ever have. This isn’t your average chocolate mousse; it’s a multi-layered chocolate extravaganza that combines different textures and chocolate intensities for an unforgettable dessert experience.
I first encountered a version of this dessert at a small French bistro tucked away in a cobblestone alley during a trip to Paris. The moment that first spoonful touched my lips, I knew I had to recreate it at home. After years of testing and tweaking, I’ve perfected my own version that I believe rivals even that Parisian delight.
Let me walk you through creating this show-stopping dessert that’s perfect for special occasions or whenever you need a serious chocolate fix. Don’t be intimidated by the multiple components – each step is manageable, and the result is absolutely worth it.
What Makes This Mousse “Death by Chocolate”?
This isn’t just chocolate mousse – it’s a full chocolate experience with:
- A dark chocolate cookie base
- Silky chocolate ganache layer
- Ethereal chocolate mousse
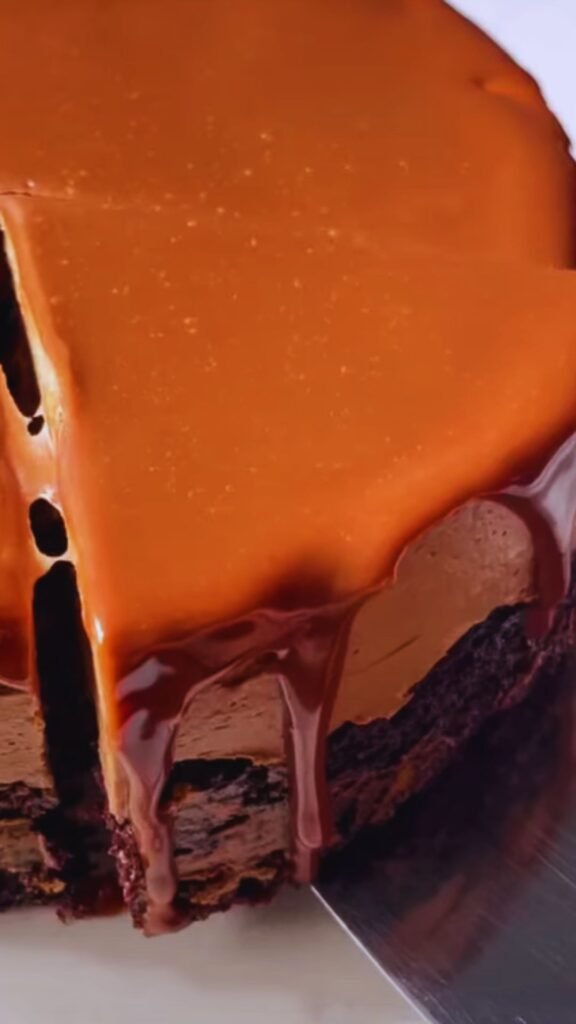
- Chocolate mirror glaze
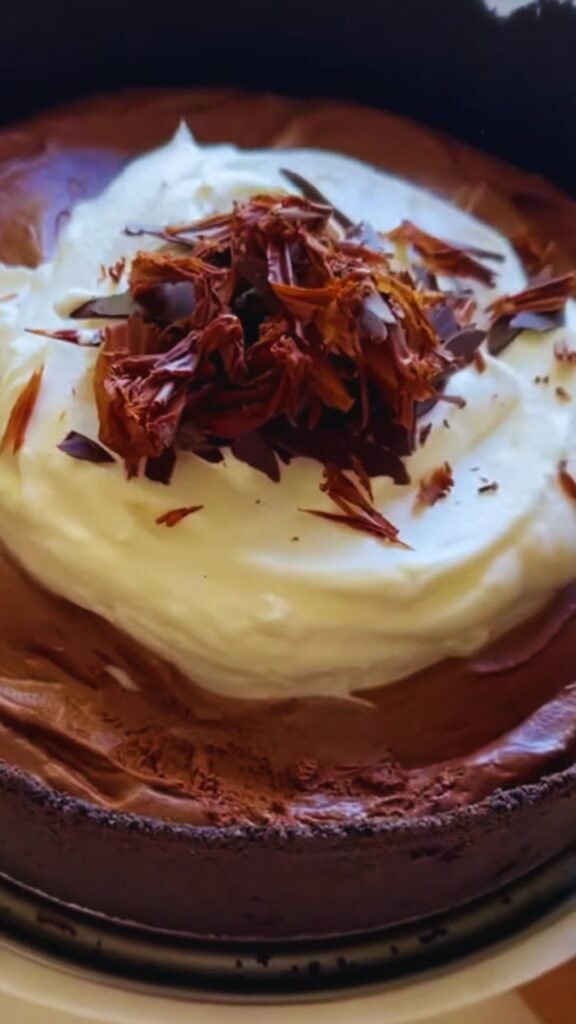
- Chocolate shavings and decorations
Each element brings its own texture and intensity, creating a symphony of chocolate in every bite. The combination is intense yet balanced, rich yet not overwhelming.
Ingredients
For the Chocolate Cookie Base
- 200g dark chocolate cookies (like Oreos with filling removed)
- 75g unsalted butter, melted
- Pinch of sea salt
For the Chocolate Ganache Layer
- 200g high-quality dark chocolate (70% cocoa solids)
- 175ml heavy cream
- 25g unsalted butter, room temperature
- 1 tbsp coffee liqueur (optional)
For the Chocolate Mousse
- 250g high-quality dark chocolate (60-65% cocoa solids)
- 60g unsalted butter
- 5 large eggs, separated (ensure they’re fresh and at room temperature)
- 50g granulated sugar
- 250ml heavy cream
- 1 tsp vanilla extract
- Pinch of salt
For the Mirror Glaze (Optional but Recommended)
- 100g high-quality dark chocolate (70% cocoa solids)
- 100ml heavy cream
- 2 tbsp glucose syrup (or corn syrup)
- 15g unsalted butter
For Decoration
- Dark chocolate shavings
- White chocolate curls
- Gold leaf (for special occasions)
- Fresh raspberries (optional)
- Mint leaves (optional)
Equipment Needed
- 6-8 serving glasses or ramekins (depending on size)
- Food processor or rolling pin and plastic bag
- Several mixing bowls
- Electric mixer (hand or stand)
- Rubber spatulas
- Saucepans
- Thermometer (helpful but not essential)
- Piping bag with large round tip (optional for elegant presentation)
- Microplane or chocolate shaver
Preparation Time
| Task | Time |
|---|---|
| Cookie Base | 15 minutes |
| Ganache Layer | 20 minutes + 1 hour cooling |
| Chocolate Mousse | 30 minutes + 4 hours setting |
| Mirror Glaze | 15 minutes + 30 minutes cooling |
| Assembly and Decoration | 20 minutes |
| Total Active Time | 1 hour 40 minutes |
| Total Time (including cooling/setting) | 7 hours (or overnight) |
Nutritional Information (Per Serving, based on 6 servings)
| Nutrient | Amount |
|---|---|
| Calories | 785 kcal |
| Total Fat | 58g |
| – Saturated Fat | 35g |
| Cholesterol | 220mg |
| Sodium | 120mg |
| Total Carbohydrates | 55g |
| – Dietary Fiber | 5g |
| – Sugars | 42g |
| Protein | 10g |
Step-by-Step Instructions
Making the Chocolate Cookie Base
- Place the chocolate cookies in a food processor and pulse until you have fine crumbs. If you don’t have a food processor, place cookies in a sealed plastic bag and crush them with a rolling pin.
- Transfer the cookie crumbs to a bowl and pour in the melted butter and salt. Mix until the crumbs are evenly moistened and resemble wet sand.
- Divide the mixture among your serving glasses, pressing it firmly into the bottom to create an even layer. Use the back of a spoon to compact it well.
- Refrigerate while you prepare the ganache layer.
Creating the Chocolate Ganache Layer
- Chop the dark chocolate into small pieces and place in a heatproof bowl.
- Heat the heavy cream in a small saucepan until it just begins to simmer (small bubbles appear around the edge). Don’t let it boil.
- Pour the hot cream over the chocolate and let it sit undisturbed for 2 minutes to melt the chocolate.
- Gently stir the mixture with a rubber spatula until smooth and all chocolate has melted.
- Add the softened butter and coffee liqueur (if using) and stir until fully incorporated. The mixture should be glossy and smooth.
- Pour the ganache over the cookie base in each glass, dividing it equally. You want a layer approximately 1cm thick.
- Return to the refrigerator for at least 1 hour until set.
Preparing the Chocolate Mousse (The Star of the Show)
- Chop the chocolate into small pieces and place in a heatproof bowl with the butter.
- Melt the chocolate and butter together using a double boiler (place the bowl over a pan of barely simmering water, ensuring the bowl doesn’t touch the water) or in short bursts in the microwave, stirring between each burst. Let cool slightly until warm but not hot.
- In a clean bowl, whisk the egg whites with a pinch of salt until foamy. Gradually add the sugar while continuing to whisk until you achieve soft peaks.
- In another bowl, whip the heavy cream and vanilla until it forms soft peaks. Be careful not to overwhip.
- Whisk the egg yolks into the cooled chocolate mixture one at a time, mixing well after each addition.
- Gently fold a third of the whipped cream into the chocolate mixture to lighten it.
- Add a third of the egg whites and fold gently using a figure-eight motion with your spatula, cutting through the center and around the sides of the bowl. Repeat with remaining cream and egg whites in two more additions, until just combined with no visible streaks.
- The resulting mousse should be light yet rich, with an airy texture.
Assembling the Mousse Layer
- Remove the glasses with the set ganache layer from the refrigerator.
- Spoon or pipe the mousse on top of the ganache layer, filling to about 1cm from the top of each glass.
- Smooth the surface with the back of a spoon or an offset spatula.
- Cover each glass with plastic wrap (not touching the mousse) and refrigerate for at least 4 hours or ideally overnight.
Creating the Mirror Glaze (Optional)
- Chop the chocolate into small pieces and place in a medium bowl.
- Heat the cream and glucose syrup in a small saucepan until it just begins to simmer.
- Pour over the chocolate and let stand for 2 minutes, then stir until smooth.
- Add the butter and stir until fully incorporated and the glaze is glossy.
- Allow to cool until the glaze reaches about 35°C (95°F) – it should be pourable but not hot.
- Remove the set mousses from the refrigerator and pour a thin layer of glaze over the top of each. Tilt each glass gently to ensure even coverage.
- Return to the refrigerator for 30 minutes to set the glaze.

Final Decoration
- Just before serving, top each mousse with chocolate shavings, white chocolate curls, and if using, a small piece of gold leaf.
- For a touch of color contrast and freshness, add a few fresh raspberries and mint leaves to the side.
Expert Tips for Perfect Chocolate Mousse
- Use the best chocolate you can afford: The quality of chocolate makes an enormous difference in this recipe. Look for chocolate with at least 60% cocoa solids for the mousse and 70% for the ganache and glaze.
- Temperature matters: Ensure your egg whites are at room temperature for maximum volume when whipping. Conversely, your cream should be cold from the refrigerator.
- The folding technique is crucial: When incorporating the whipped cream and egg whites into the chocolate mixture, use a gentle folding motion to maintain as much air as possible. This ensures your mousse will be light and airy.
- Raw egg safety: If you’re concerned about using raw eggs, look for pasteurized eggs, or briefly heat the egg yolks with a little sugar to 160°F (71°C) while whisking constantly before adding to the chocolate.
- Make ahead: This dessert actually benefits from being made a day ahead – the flavors meld and intensify.
Serving Suggestions
This Death by Chocolate Mousse is a statement dessert that needs little accompaniment. However, here are some suggestions to elevate your serving:
- Serve with a small espresso to cut through the richness
- Pair with fresh berries for a fruity contrast
- Add a dollop of lightly sweetened whipped cream
- A light dusting of cocoa powder just before serving
- For special occasions, serve with a glass of sparkling water with a twist of orange
Variations to Try
While the classic version is my absolute favorite, here are some variations you might enjoy:
- Mint Chocolate: Add 1/4 teaspoon of peppermint extract to the mousse mixture
- Orange Chocolate: Add the zest of one orange to the ganache layer
- Chili Chocolate: Add a pinch of cayenne pepper to the ganache for a gentle heat
- White Chocolate Layer: Replace the mirror glaze with a white chocolate ganache for a striking visual contrast
- Salted Caramel Addition: Add a layer of salted caramel between the cookie base and ganache
Storage Instructions
This mousse will keep well in the refrigerator for up to 3 days. Keep it covered with plastic wrap to prevent it from absorbing other flavors from the refrigerator. I don’t recommend freezing as it can affect the delicate texture of the mousse.
Common Problems and Solutions
| Problem | Cause | Solution |
|---|---|---|
| Grainy mousse | Chocolate seized during melting | Ensure no water gets into chocolate while melting; melt at low temperature |
| Mousse isn’t setting | Cream not whipped enough or overfolded | Whip cream to soft peaks; fold gently to maintain air |
| Ganache is too firm | Too much chocolate or not enough cream | Use a 1:1 ratio of chocolate to cream for softer ganache |
| Mousse is too sweet | Type of chocolate used | Use chocolate with higher cocoa percentage (70%+) |
| Mousse is deflating | Overmixing or not enough chilling time | Fold gently; ensure adequate refrigeration time |
Health Considerations
This is unquestionably an indulgent dessert, but here are some points to consider:
- Dark chocolate (especially 70%+ cocoa) contains antioxidants
- For a lighter version, use smaller serving glasses
- The recipe can be adapted for dietary restrictions:
- For gluten-free, use gluten-free cookies for the base
- For less sugar, use chocolate with higher cocoa content and reduce added sugar
- For lactose issues, dairy-free alternatives can work (though texture may vary)
Remember, this is a special occasion dessert – it’s meant to be savored and enjoyed mindfully!
Questions & Answers
Q: Can I make this dessert in advance for a dinner party? A: Absolutely! In fact, I recommend making it the day before. The flavors develop beautifully overnight, and it gives the mousse plenty of time to set properly.
Q: Is it possible to make a larger version instead of individual portions? A: Yes, you can make this in a large trifle dish or spring-form pan. For a spring-form pan, I recommend lining it with acetate strips to help with clean removal. The setting time may need to be increased by 1-2 hours.
Q: Can I use milk chocolate instead of dark chocolate? A: While you technically can, I don’t recommend it for this particular recipe. Milk chocolate has less cocoa solids and more sugar, which will make the dessert overly sweet and may affect the setting properties. The “death by chocolate” experience really relies on the intensity of dark chocolate.
Q: What can I substitute for the coffee liqueur? A: You can simply omit it or use 1 teaspoon of instant espresso powder dissolved in 1 tablespoon of hot water for a non-alcoholic version. The coffee simply enhances the chocolate flavor without making it taste like coffee.
Q: How do I know when my mousse is properly set? A: When properly set, the mousse should have a slight jiggle but hold its shape when tilted. If you insert a small spoon, it should leave a clear impression that holds its shape.
Q: Can I use this recipe for a chocolate mousse cake? A: Yes! For a mousse cake, use a springform pan lined with parchment paper. Follow the same layering technique, and chill for at least 6 hours or overnight before removing from the pan.
Q: My ganache split and looks oily. What went wrong? A: This usually happens when the cream is too hot or if water gets into the mixture. To save a split ganache, warm it gently while adding a small splash of warm cream and whisking constantly until it comes back together.
Q: Is there a way to make this recipe without eggs? A: You can substitute the eggs with aquafaba (the liquid from a can of chickpeas). Use 3 tablespoons per egg white and whip it just as you would egg whites. The texture will be slightly different but still delicious.
Final Thoughts
Creating this Death by Chocolate Mousse is a labor of love, but it’s one that pays off tremendously in the end. There’s something magical about watching people take their first bite and seeing their eyes widen with surprise and pleasure. This isn’t just dessert; it’s an experience—a rich, indulgent celebration of chocolate in all its glory.
I find that making this mousse has become something of a meditation for me—the careful tempering of chocolate, the gentle folding of ingredients, the patient waiting as layers set. It’s a reminder that some of the best things in life can’t be rushed.
Whether you’re making this for a special celebration or simply because you deserve a extraordinary chocolate treat, I hope you enjoy both the process and the result. And remember, when it comes to chocolate, sometimes more really is more!

