There’s something magical about the combination of golden, crispy potatoes and caramelized onions that makes my heart sing every time I pull this dish from the oven. I’ve been perfecting this oven-fried potatoes and onions recipe for years, and I can confidently say it’s become one of my most requested side dishes at family gatherings and dinner parties.
The beauty of this recipe lies in its simplicity and versatility. Unlike traditional fried potatoes that require constant attention and loads of oil, my oven-fried version delivers the same satisfying crunch and flavor with minimal effort and much less guilt. The high heat of the oven creates a beautiful caramelization on both the potatoes and onions, resulting in a dish that’s crispy on the outside and tender on the inside.
Why I Love This Recipe
I discovered this method during a particularly busy week when I needed a hands-off side dish that could feed a crowd. Traditional stovetop frying requires constant stirring and monitoring, but this oven method allows me to prep everything, slide it into the oven, and focus on other dishes while it works its magic.
The transformation that happens in the oven is truly remarkable. The potatoes develop a gorgeous golden crust while maintaining their fluffy interior, and the onions become sweet and caramelized, creating layers of flavor that complement each other perfectly. I’ve served this dish alongside everything from grilled chicken to holiday roasts, and it never fails to impress.
Essential Ingredients for Perfect Oven Fried Potatoes & Onions
Primary Ingredients
Potatoes (2-3 pounds) : Choose russet or Yukon Gold potatoes for the best texture. Russets create fluffier interiors, while Yukon Golds offer a creamier consistency.
Yellow Onions (2 large) : Sweet onions work beautifully too, but yellow onions provide the perfect balance of sweetness and sharpness when caramelized.
Olive Oil (1/4 cup) : Extra virgin olive oil adds flavor, but regular olive oil works fine if you prefer a more neutral taste.
Salt (2 teaspoons) : I use kosher salt for even distribution and better flavor control.
Black Pepper (1 teaspoon) : Freshly ground pepper makes a noticeable difference in the final dish.
Optional Flavor Enhancers
Garlic Powder (1 teaspoon) : Adds depth without the risk of burning fresh garlic.
Paprika (1 teaspoon) : Sweet paprika provides color and a subtle smoky flavor.
Fresh Herbs (2 tablespoons) : Rosemary, thyme, or oregano work wonderfully.
Parmesan Cheese (1/2 cup, grated) : Sprinkle on during the last 10 minutes for extra richness.
Detailed Preparation Guide
Preparing the Potatoes
The key to achieving restaurant-quality oven-fried potatoes starts with proper preparation. I always begin by thoroughly washing my potatoes under cold running water, scrubbing away any dirt or eyes. While some people prefer to peel their potatoes, I love leaving the skin on for extra texture and nutrition.
I cut my potatoes into uniform pieces, roughly 1-inch cubes. Consistency is crucial here because uneven pieces will cook at different rates, leaving you with some overcooked and some undercooked potatoes. After cutting, I place the potato pieces in a large bowl of cold water for at least 30 minutes. This step removes excess starch, which is essential for achieving that coveted crispy exterior.
Onion Preparation Technique
For the onions, I slice them into half-moons about 1/4-inch thick. I’ve found that thicker slices hold up better during the long cooking process and provide a nice textural contrast to the potatoes. The key is maintaining consistent thickness so they caramelize evenly.
Step-by-Step Cooking Instructions
Initial Setup
I preheat my oven to 425°F (220°C), which I’ve found to be the perfect temperature for achieving crispy edges without burning. While the oven heats, I drain the potatoes thoroughly and pat them completely dry with paper towels. Any residual moisture will create steam in the oven, preventing proper crisping.
Seasoning and Mixing
In a large mixing bowl, I combine the dried potatoes with sliced onions, olive oil, salt, pepper, and any additional seasonings. I use my hands to toss everything together, ensuring every piece is well-coated with oil and seasonings. This hands-on approach allows me to feel that each piece is properly coated.
Arranging on the Baking Sheet
I spread the potato and onion mixture on a large, rimmed baking sheet in a single layer. Overcrowding is the enemy of crispy potatoes, so I use two baking sheets if necessary. The vegetables should have space around them to allow proper air circulation and browning.
Cooking Process
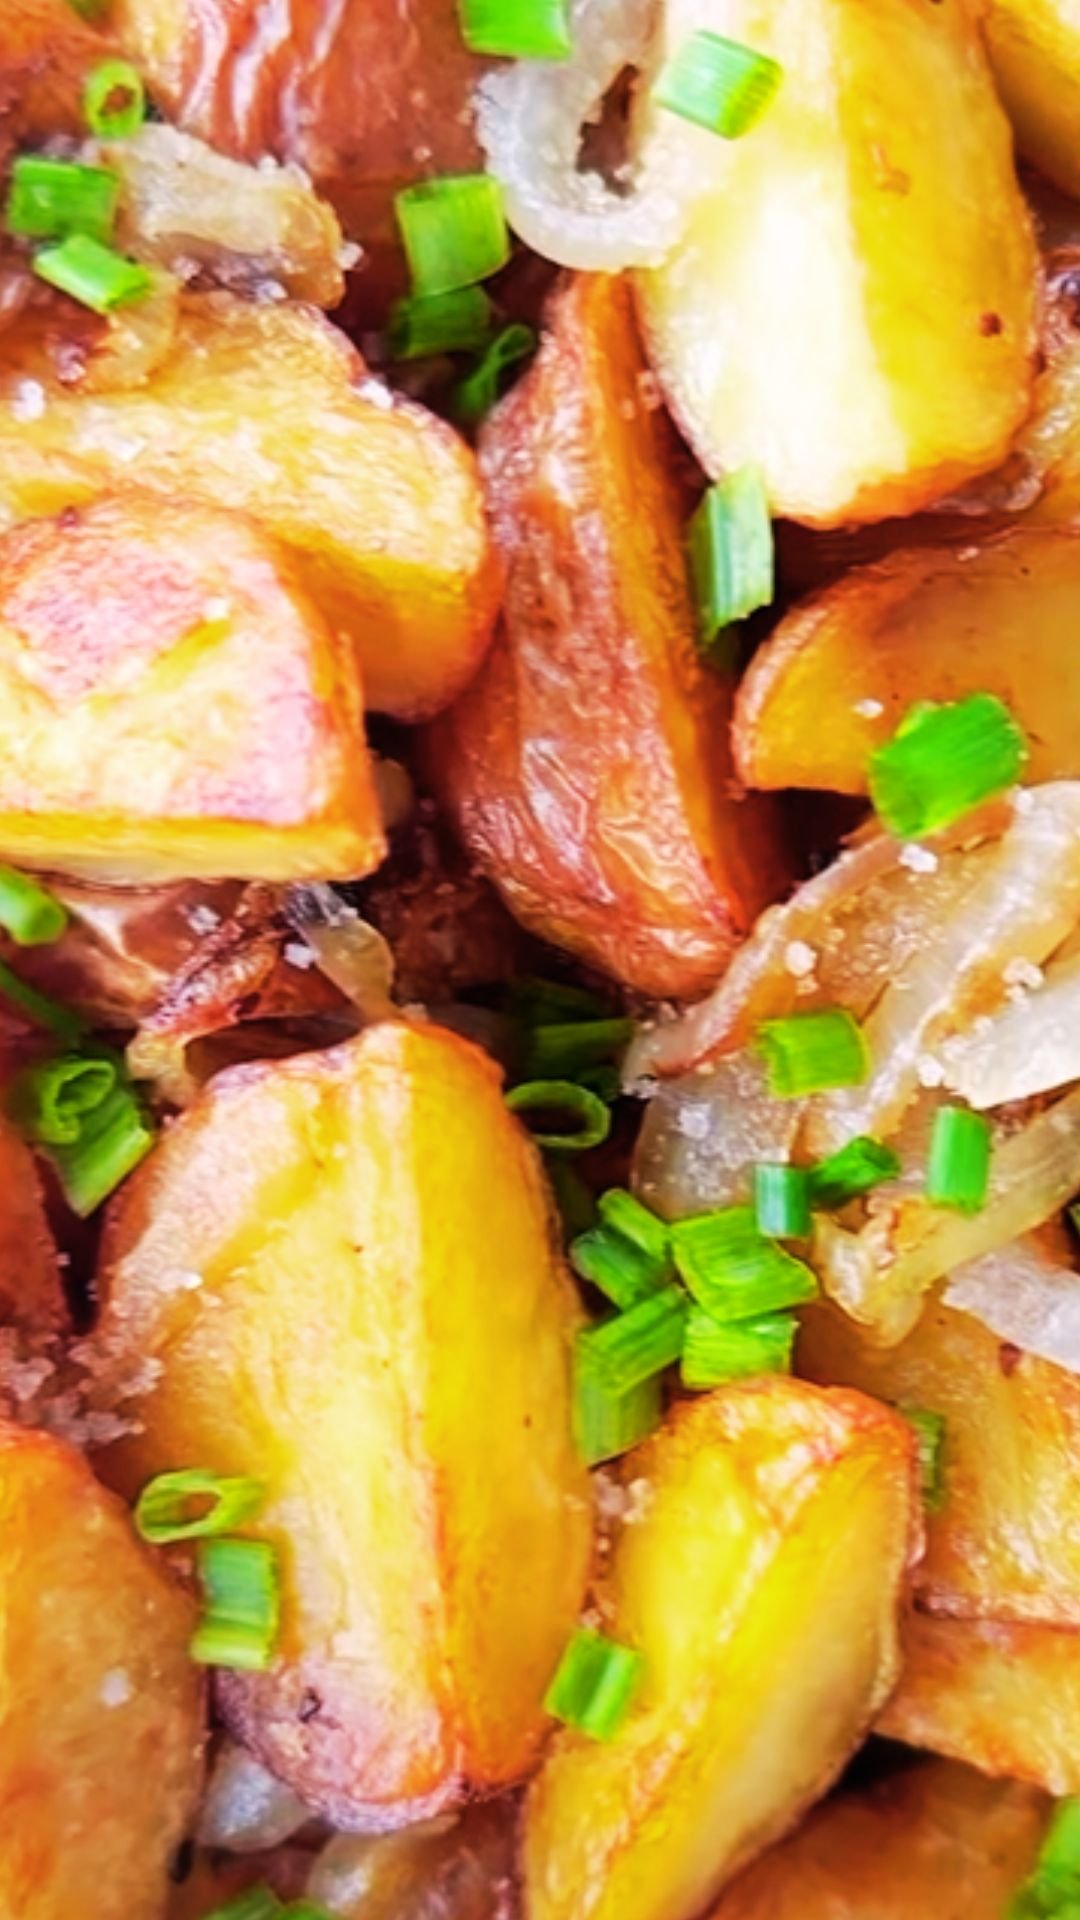
I place the baking sheet on the middle rack of my preheated oven and set my timer for 25 minutes. After this initial cooking period, I remove the pan and use a spatula to flip and rearrange the potatoes and onions. This ensures even browning on all sides.
I return the pan to the oven for another 20-25 minutes, until the potatoes are golden brown and crispy on the outside and tender when pierced with a fork. The onions should be beautifully caramelized and slightly crispy at the edges.
Nutritional Information and Health Benefits
| Nutrient | Per Serving (1 cup) | % Daily Value |
|---|---|---|
| Calories | 185 | 9% |
| Total Fat | 7g | 11% |
| Saturated Fat | 1g | 5% |
| Sodium | 390mg | 17% |
| Total Carbohydrates | 29g | 11% |
| Dietary Fiber | 3g | 11% |
| Protein | 4g | 8% |
| Vitamin C | 12mg | 13% |
| Potassium | 620mg | 13% |
| Iron | 1.2mg | 7% |
Health Benefits
Potatoes are often misunderstood nutritionally, but they’re actually packed with beneficial nutrients. They’re an excellent source of potassium, which supports heart health and helps regulate blood pressure. The vitamin C content in potatoes is surprisingly high, supporting immune function and collagen production.
Onions contribute quercetin, a powerful antioxidant that may help reduce inflammation and support heart health. They also contain prebiotic fibers that support digestive health and beneficial gut bacteria.
By using the oven-frying method instead of traditional deep frying, I’ve significantly reduced the oil content while maintaining the satisfying texture and flavor that makes this dish so appealing.
Cooking Tips and Techniques
Temperature Control
I’ve experimented with various oven temperatures over the years, and 425°F consistently delivers the best results. Lower temperatures don’t create enough browning, while higher temperatures risk burning the vegetables before they’re fully cooked through.
Timing Variations
Cooking times can vary based on the size of your potato pieces and your oven’s characteristics. I always check for doneness by testing a few pieces with a fork. The potatoes should be tender inside but still hold their shape, and the exterior should be golden and crispy.
Seasoning Adjustments
I’ve learned that seasoning before cooking allows the flavors to penetrate the vegetables, but I also like to add a final sprinkle of salt immediately after removing the dish from the oven. This creates layers of flavor that make each bite more interesting.
Variations and Flavor Combinations
Mediterranean Style
I love adding dried oregano, crumbled feta cheese, and a squeeze of lemon juice for a Mediterranean twist. The tangy cheese pairs beautifully with the sweet caramelized onions.
Herb-Crusted Version
Fresh rosemary and thyme create an aromatic herb crust that elevates this simple dish to restaurant quality. I add the herbs during the last 15 minutes of cooking to prevent them from burning.
Spicy Southwest
For those who enjoy heat, I incorporate chili powder, cumin, and a pinch of cayenne pepper. A sprinkle of fresh cilantro after cooking adds brightness and color.
Garlic Parmesan
Adding minced garlic and grated Parmesan cheese during the last 10 minutes creates a rich, savory coating that’s absolutely irresistible.
Storage and Reheating Guidelines
| Storage Method | Duration | Quality Rating |
|---|---|---|
| Refrigerator | 3-4 days | Excellent |
| Freezer | 2-3 months | Good |
| Room Temperature | 2 hours max | Not recommended |
Proper Storage Techniques
I store leftover oven-fried potatoes and onions in airtight containers in the refrigerator. They maintain their flavor well, though they do lose some crispiness over time.
Reheating Methods
For the best results, I reheat leftovers in a 400°F oven for 8-10 minutes, which helps restore some of the original crispiness. While you can use a microwave for convenience, it will make the potatoes softer and less appealing.
Serving Suggestions and Pairings
Main Dish Pairings
This versatile side dish complements a wide range of main courses. I frequently serve it with grilled chicken, roasted beef, or baked fish. The neutral flavors work well with both bold and subtle main dishes.
Breakfast Applications
These oven-fried potatoes make an excellent breakfast side dish. I serve them alongside scrambled eggs, bacon, or breakfast sausage for a hearty morning meal.
Casual Dining
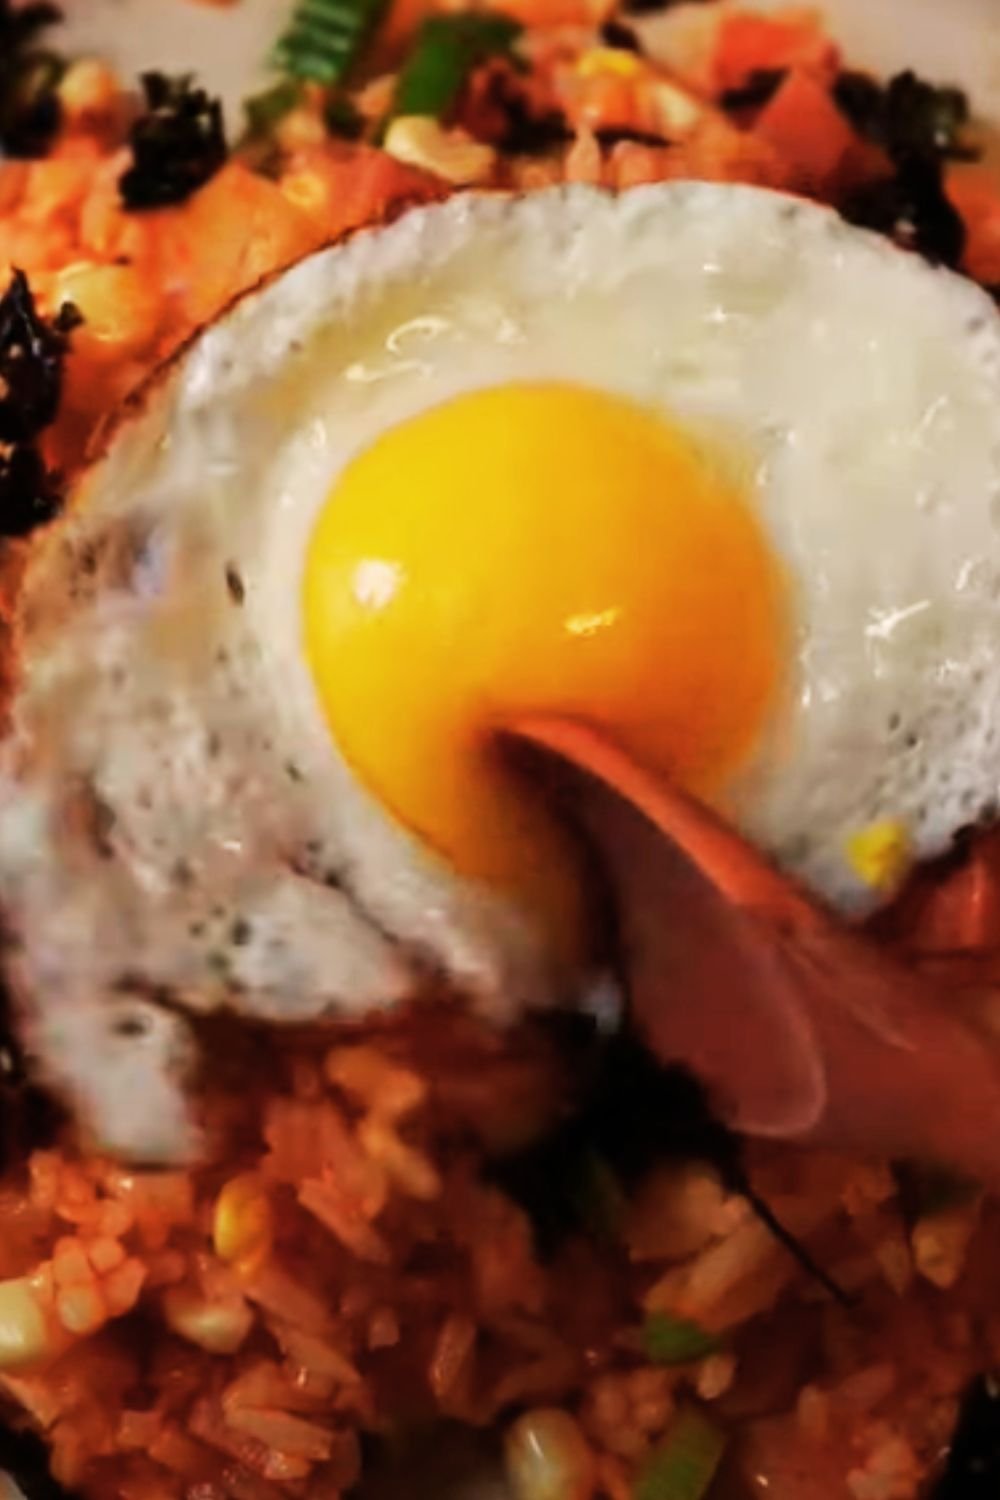
For casual meals, I sometimes turn this into a main dish by topping it with fried eggs and serving it with a simple green salad.
Troubleshooting Common Issues
Problem: Soggy Potatoes
Solution: Ensure potatoes are completely dry before cooking, don’t overcrowd the pan, and use adequate oil coating.
Problem: Uneven Browning
Solution: Cut potatoes into uniform sizes, flip them halfway through cooking, and ensure even spacing on the baking sheet.
Problem: Burnt Onions
Solution: If onions are browning too quickly, cover them with foil during the last part of cooking, or add them 10 minutes after the potatoes start cooking.
Equipment and Tools
Essential Equipment
Large Rimmed Baking Sheet : A heavy-duty baking sheet prevents warping and ensures even heat distribution.
Sharp Knife : A good chef’s knife makes quick work of cutting uniform potato pieces.
Large Mixing Bowl : Provides adequate space for thorough mixing and coating.
Thin Spatula : Essential for flipping delicate potato pieces without breaking them.
Helpful Additions
A digital timer helps ensure perfect timing, and I always keep a fork handy for testing doneness. Parchment paper can make cleanup easier, though it’s not strictly necessary.
Seasonal Adaptations
Summer Variations
During summer months, I love adding fresh herbs from my garden. Basil, oregano, and thyme all work beautifully and add fresh, bright flavors.
Winter Comfort
In colder months, I incorporate warming spices like sage, rosemary, and a touch of nutmeg. These seasonal additions create a more comforting, hearty dish.
Holiday Presentations
For special occasions, I arrange the finished potatoes and onions on a large platter and garnish with fresh herbs and a light dusting of paprika for visual appeal.
Cost Analysis and Budget-Friendly Tips
| Ingredient | Approximate Cost | Servings | Cost per Serving |
|---|---|---|---|
| Potatoes (3 lbs) | $2.50 | 8 | $0.31 |
| Onions (2 large) | $1.00 | 8 | $0.13 |
| Olive Oil (1/4 cup) | $0.75 | 8 | $0.09 |
| Seasonings | $0.25 | 8 | $0.03 |
| Total | $4.50 | 8 | $0.56 |
This recipe is incredibly budget-friendly, costing less than $5 to feed eight people generously. I often make this dish when I need to stretch my grocery budget without sacrificing flavor or satisfaction.
Q&A Section
Q: Can I use different types of potatoes for this recipe? A: Absolutely! While I prefer russet or Yukon Gold potatoes for their texture, red potatoes work well too. They’ll maintain their shape better but won’t get quite as fluffy inside. Sweet potatoes are also delicious but will cook faster, so adjust your timing accordingly.
Q: How do I prevent my potatoes from sticking to the baking sheet? A: I ensure the potatoes are well-coated with oil and sometimes use parchment paper for easier cleanup. If you’re concerned about sticking, lightly oil your baking sheet before adding the vegetables.
Q: Can I prepare this dish ahead of time? A: Yes! I often prep the potatoes and onions in the morning, store them in the refrigerator, and cook them when needed. Just bring them to room temperature before baking for even cooking.
Q: What’s the best way to achieve maximum crispiness? A: The secrets to crispy potatoes are: soaking cut potatoes to remove excess starch, ensuring they’re completely dry before cooking, not overcrowding the pan, and using adequate oil. High heat (425°F) is also crucial.
Q: Can I make this recipe vegan? A: This recipe is already naturally vegan! Just ensure you’re using plant-based oil and skip any cheese additions I mention in the variations.
Q: How do I know when the potatoes are done? A: The potatoes should be golden brown and crispy on the outside, and a fork should easily pierce through them. The onions should be caramelized and slightly crispy at the edges.
Q: Can I add other vegetables to this dish? A: Certainly! Bell peppers, carrots, and Brussels sprouts all work well. Just consider their cooking times and add them accordingly. Harder vegetables like carrots should be added with the potatoes, while softer ones like bell peppers can be added halfway through.
Q: What should I do if my onions are browning too quickly? A: If the onions are getting too dark before the potatoes are done, cover them with foil or remove them temporarily while the potatoes finish cooking. You can also add the onions 10-15 minutes after the potatoes start cooking.
Q: Can I double this recipe for a larger crowd? A: Yes, but use multiple baking sheets to avoid overcrowding. Overcrowded vegetables will steam rather than roast, resulting in soggy potatoes instead of crispy ones.
Q: What’s the best oil to use for this recipe? A: I prefer olive oil for its flavor, but vegetable oil, avocado oil, or even melted butter work well. Each will give slightly different flavor profiles, so choose based on your preference and what you have available.
This oven-fried potatoes and onions recipe has become a staple in my kitchen because it’s reliable, delicious, and versatile. Whether you’re serving it as a side dish for a weeknight dinner or as part of a holiday feast, it never fails to satisfy. The combination of crispy, golden potatoes and sweet, caramelized onions creates a dish that’s both comforting and elegant enough for any occasion.
The beauty of this recipe lies not just in its simplicity, but in its adaptability. I encourage you to experiment with different seasonings and additions to make it your own. Once you master this basic technique, you’ll find yourself reaching for it again and again, confident that you can create a delicious, crowd-pleasing side dish with minimal effort and maximum flavor.